AppleTV + SSL + PlexConnect
Update 5: Instructions have been updated to improve clarity in various places.
Apple updated the trailers channel recently and broke everyone’s PlexConnect by switching it over to fetching certain resources via HTTPS. Game over right? Well, no.
To fix it here is what you will need!
-
Apple Configurator (10.7+ Mac only) or iPhone Configuration Utility (Windows or 10.6 Snow Leopard)
-
A microUSB cable to attach to your AppleTV
-
Updated PlexConnect software (follow the instructions carefully!)
Okay, let’s go.
Create the Cert
Open a terminal window (Terminal.app on Mac) and run the following command
openssl req -new -nodes -newkey rsa:2048 -out ~/Desktop/trailers.pem -keyout ~/Desktop/trailers.key -x509 -days 7300 -subj "/C=US/CN=trailers.apple.com"
This will create two files on your desktop: trailers.key and trailers.pem. Next run this:
openssl x509 -in ~/Desktop/trailers.pem -outform der -out ~/Desktop/trailers.cer && cat ~/Desktop/trailers.key >> ~/Desktop/trailers.pem
At this point you will have 3 files. We’ll be using them shortly.
Windows Notes You can install OpenSSL for windows and then run the following commands in a cmd prompt window. This will work with a default OpenSSL win32 install, but you need to run cmd with administrator privileges (right click run as administrator):
C:\OpenSSL-Win32\bin\openssl.exe req -new -nodes -newkey rsa:2048 -out C:\trailers.pem -keyout C:\trailers.key -x509 -days 7300 -subj "/C=US/CN=trailers.apple.com" -config C:\OpenSSL-Win32\bin\openssl.cfg
You’ll also need to run this command
C:\OpenSSL-Win32\bin\openssl.exe x509 -in C:\trailers.pem -outform der -out C:\trailers.der
and finally run this (the word “type” is part of the command, paste this entire command into your cmd prompt)
type C:\trailers.key >> C:\trailers.pem
Create the Profile
Apple Configurator Method (iPhone Configuration Utility people scroll down!)

Turn supervision on and you should see a section called “profiles” appear. Click the plus sign and select “create new profile…”
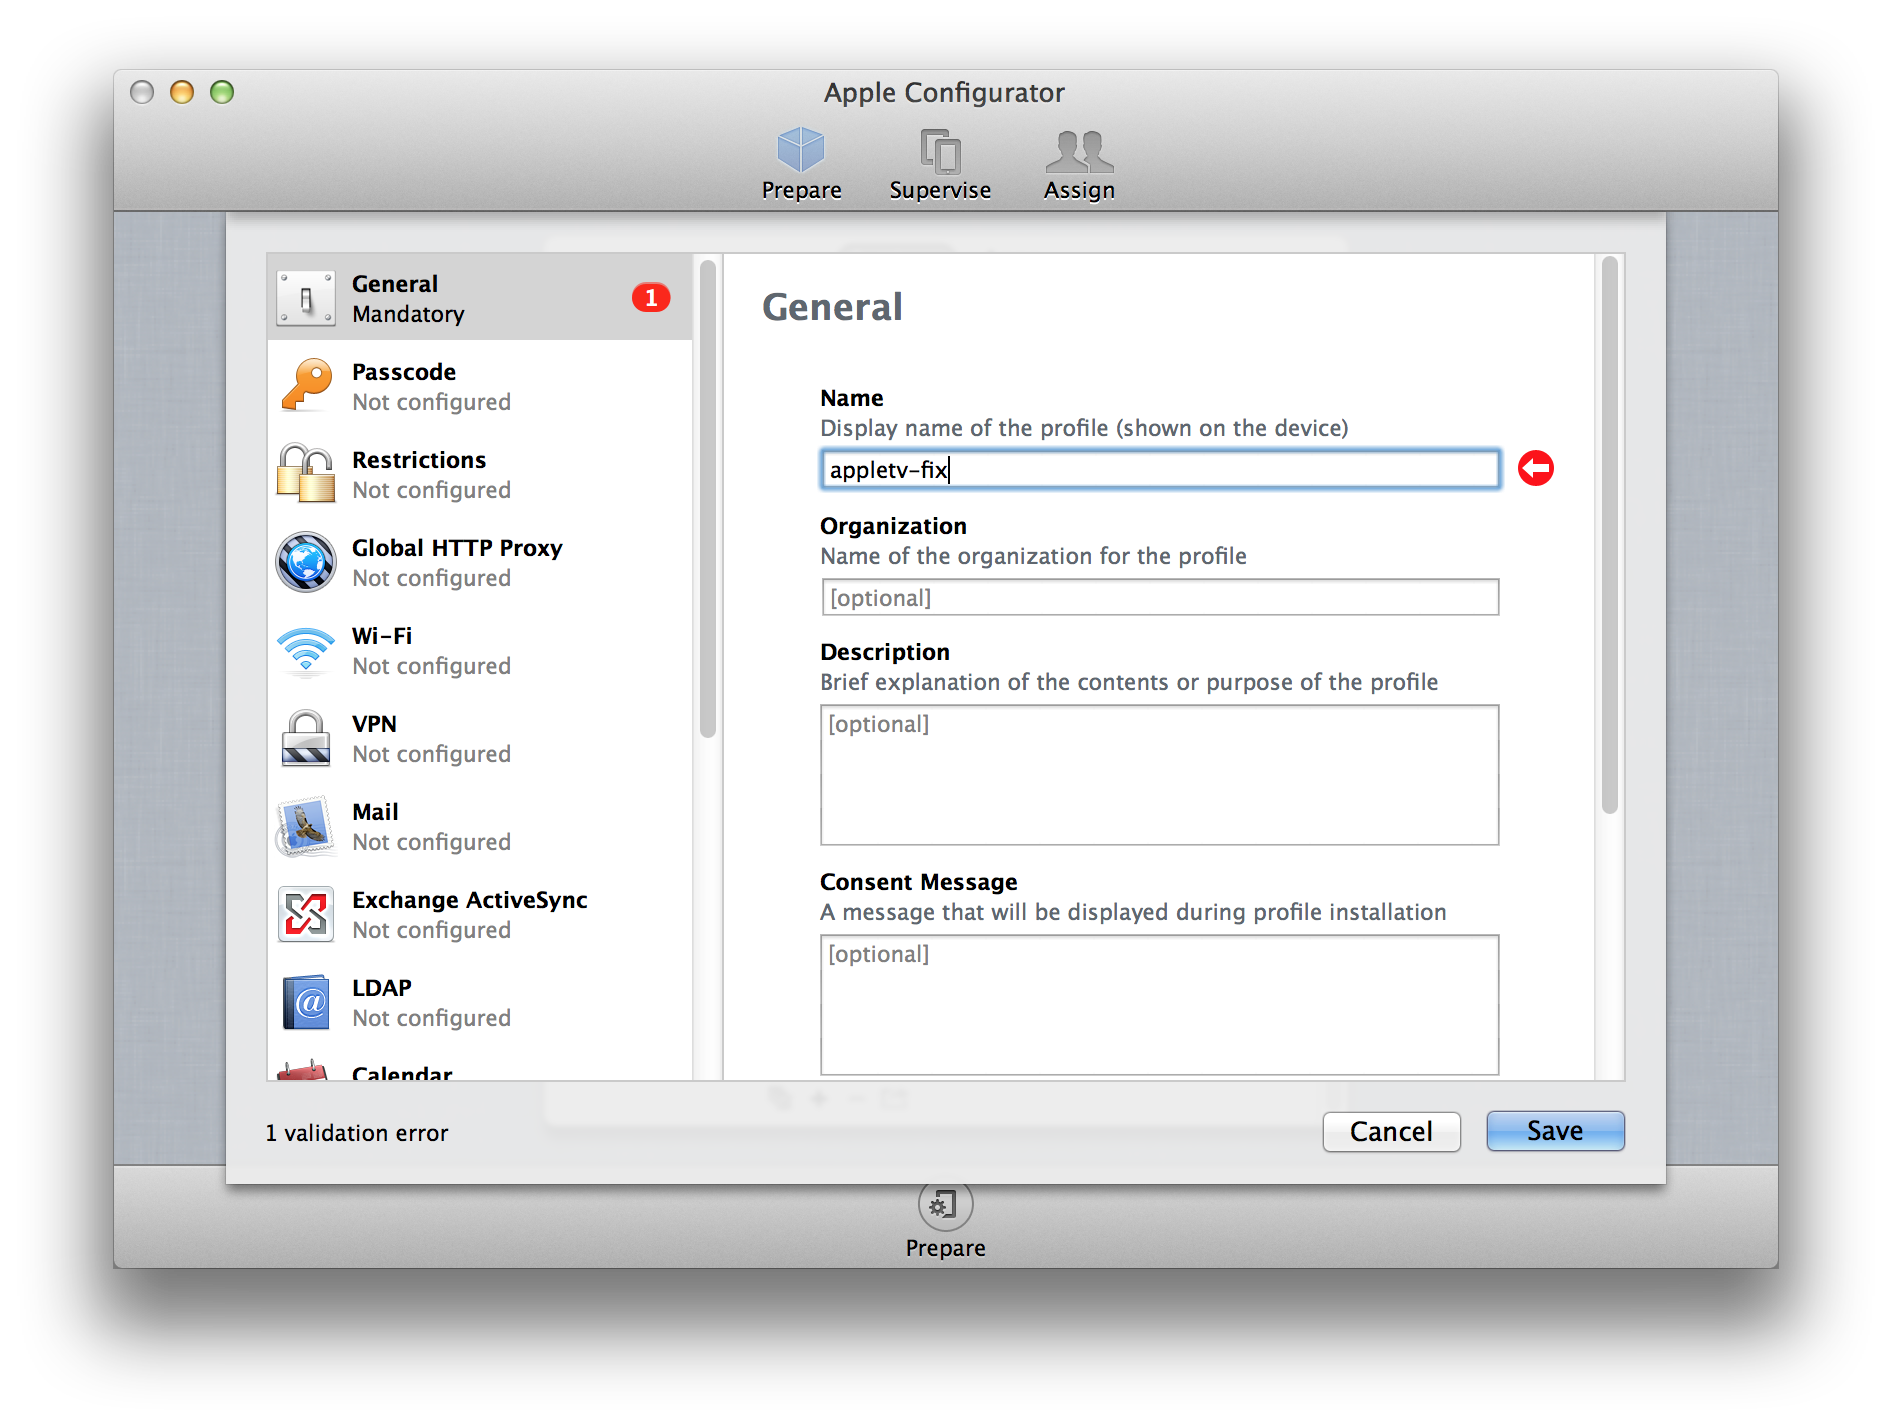
Name it whatever you’d like and then click “Certificate” on the left. Click “Configure” and then select the “trailers.cer” we created earlier. At this point click save and your profile is created.
iPhone Configuration Utility Method (SKIP TO INSTALL THE PROFILE IF YOU USED THE APPLE CONFIGURATOR METHOD screenshots are for Mac but the Windows version should work similarly)
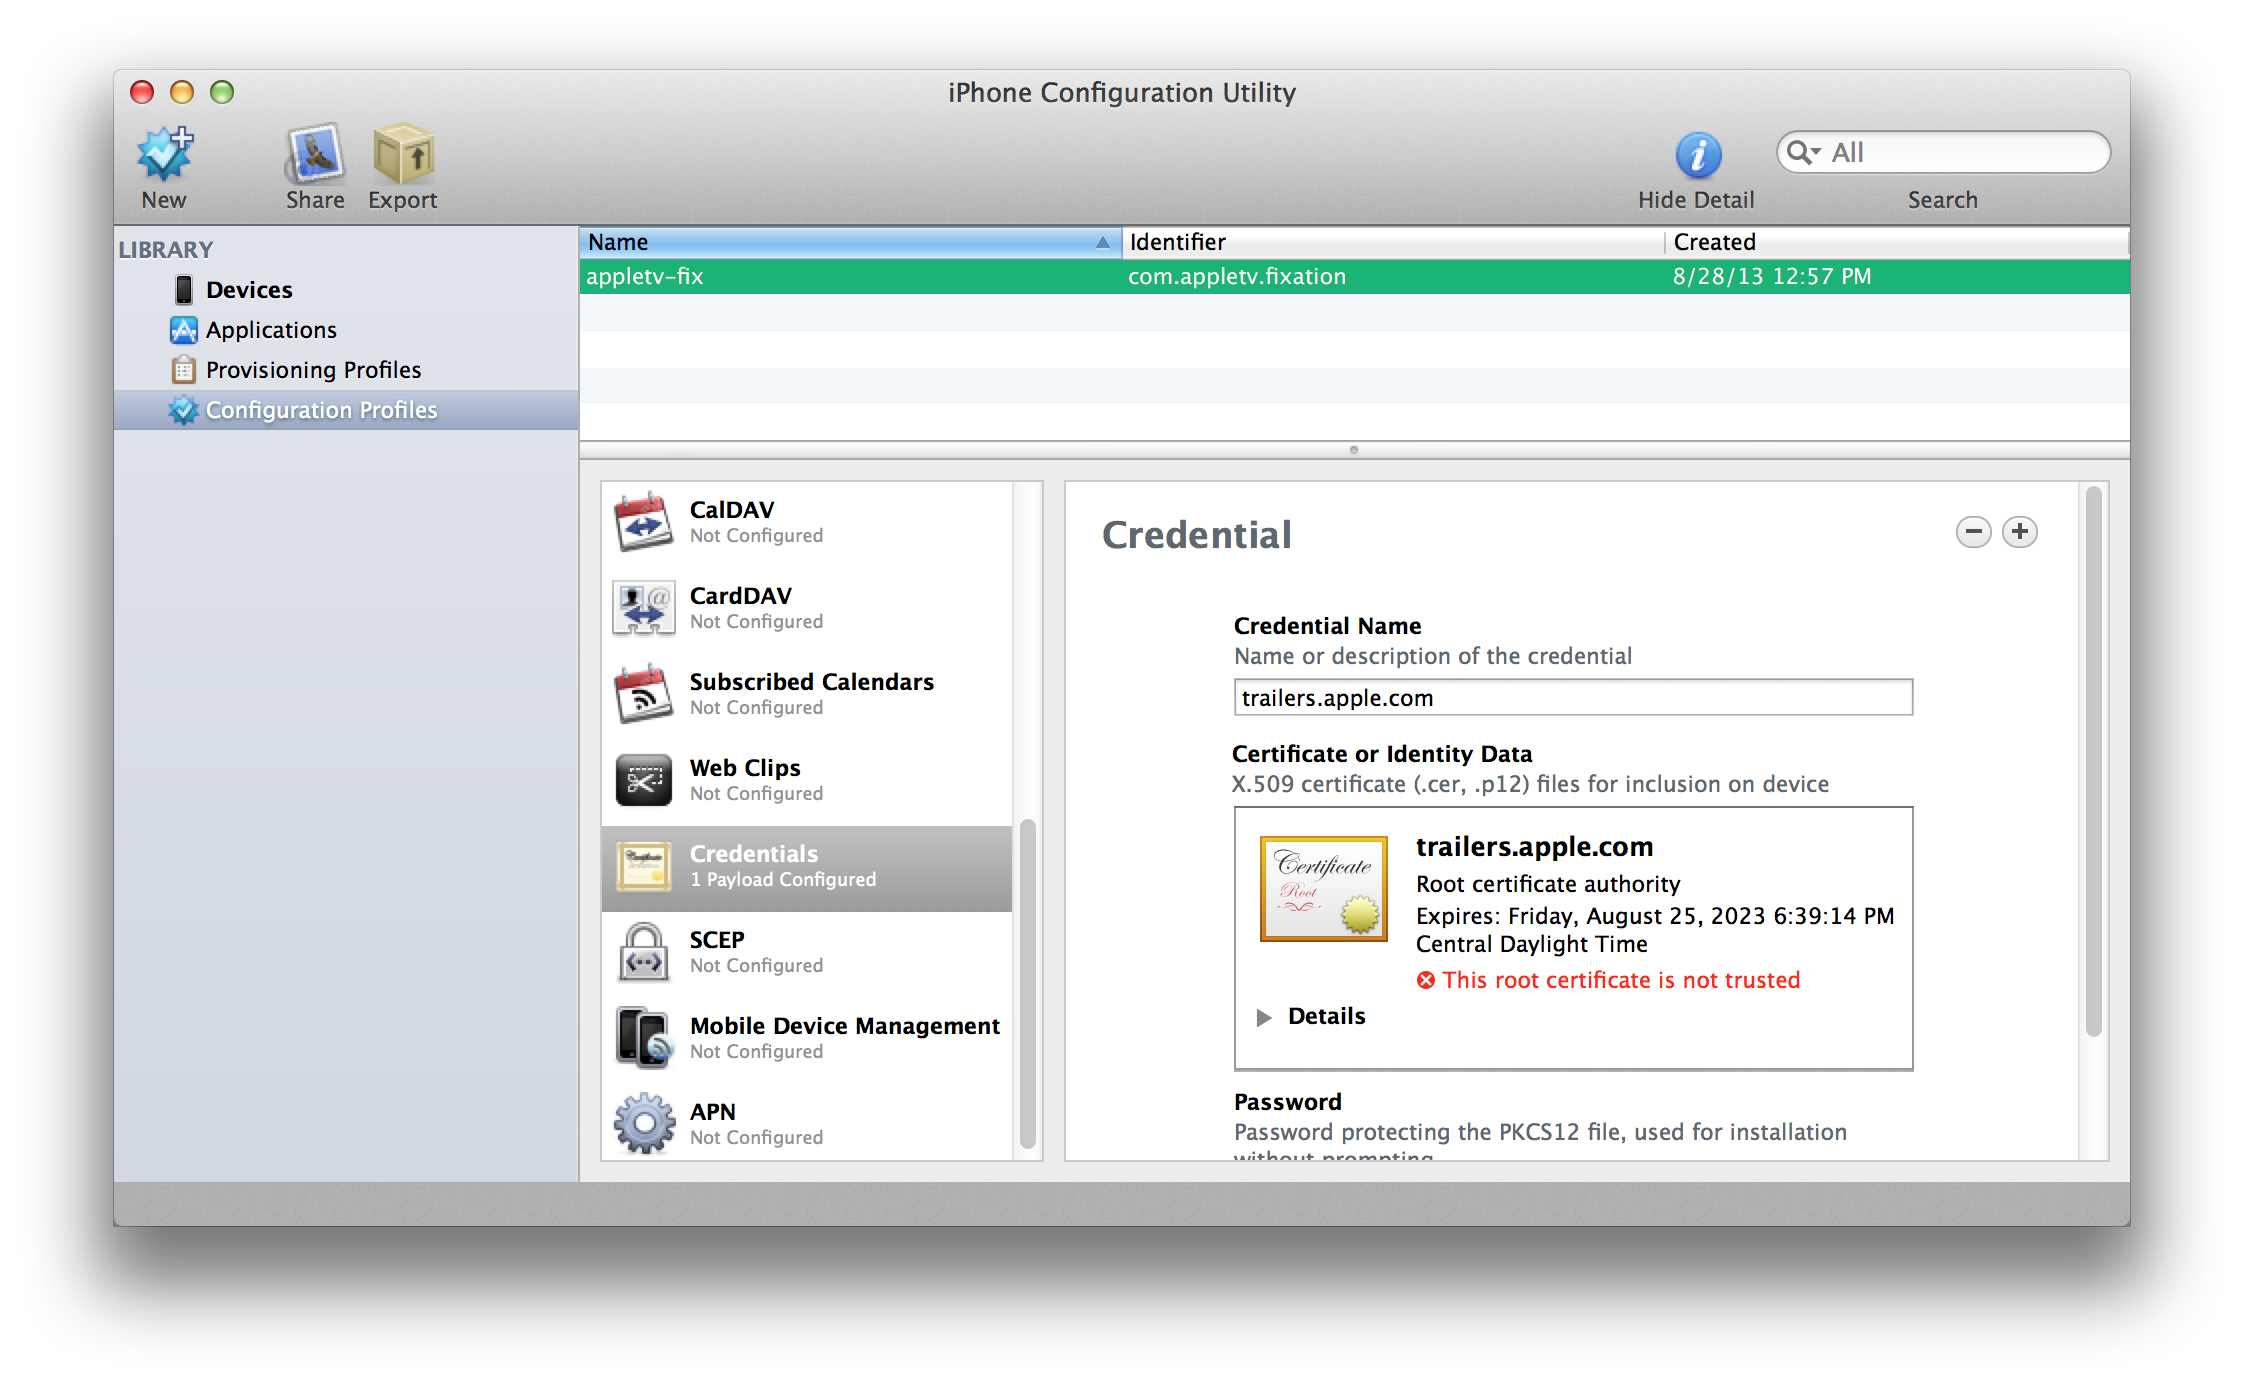
Open the app up and click Configuration Profiles on the left, then click new. Fill in the Name and Identifier with whatever names you want and then scroll down on the left pane and choose Credentials. Click Configure and add the “trailers.cer”. (Windows users, you will need to double click trailers.der and install it to your local certificate store before you do this. Once you’ve done that you should see the certificate show up when you click configure) At this point you’ll have something that looks like this:
Install the Profile
Apple Configurator Method (iPhone Configuration Utility people scroll down!)
Turn supervision back off and now click Install Profiles. You must now connect your AppleTV to your computer using the microUSB cable. You must have the AppleTV plugged into power when you do this or else it will enter recovery mode. Once it sees the device click next and select the profile you want to install.
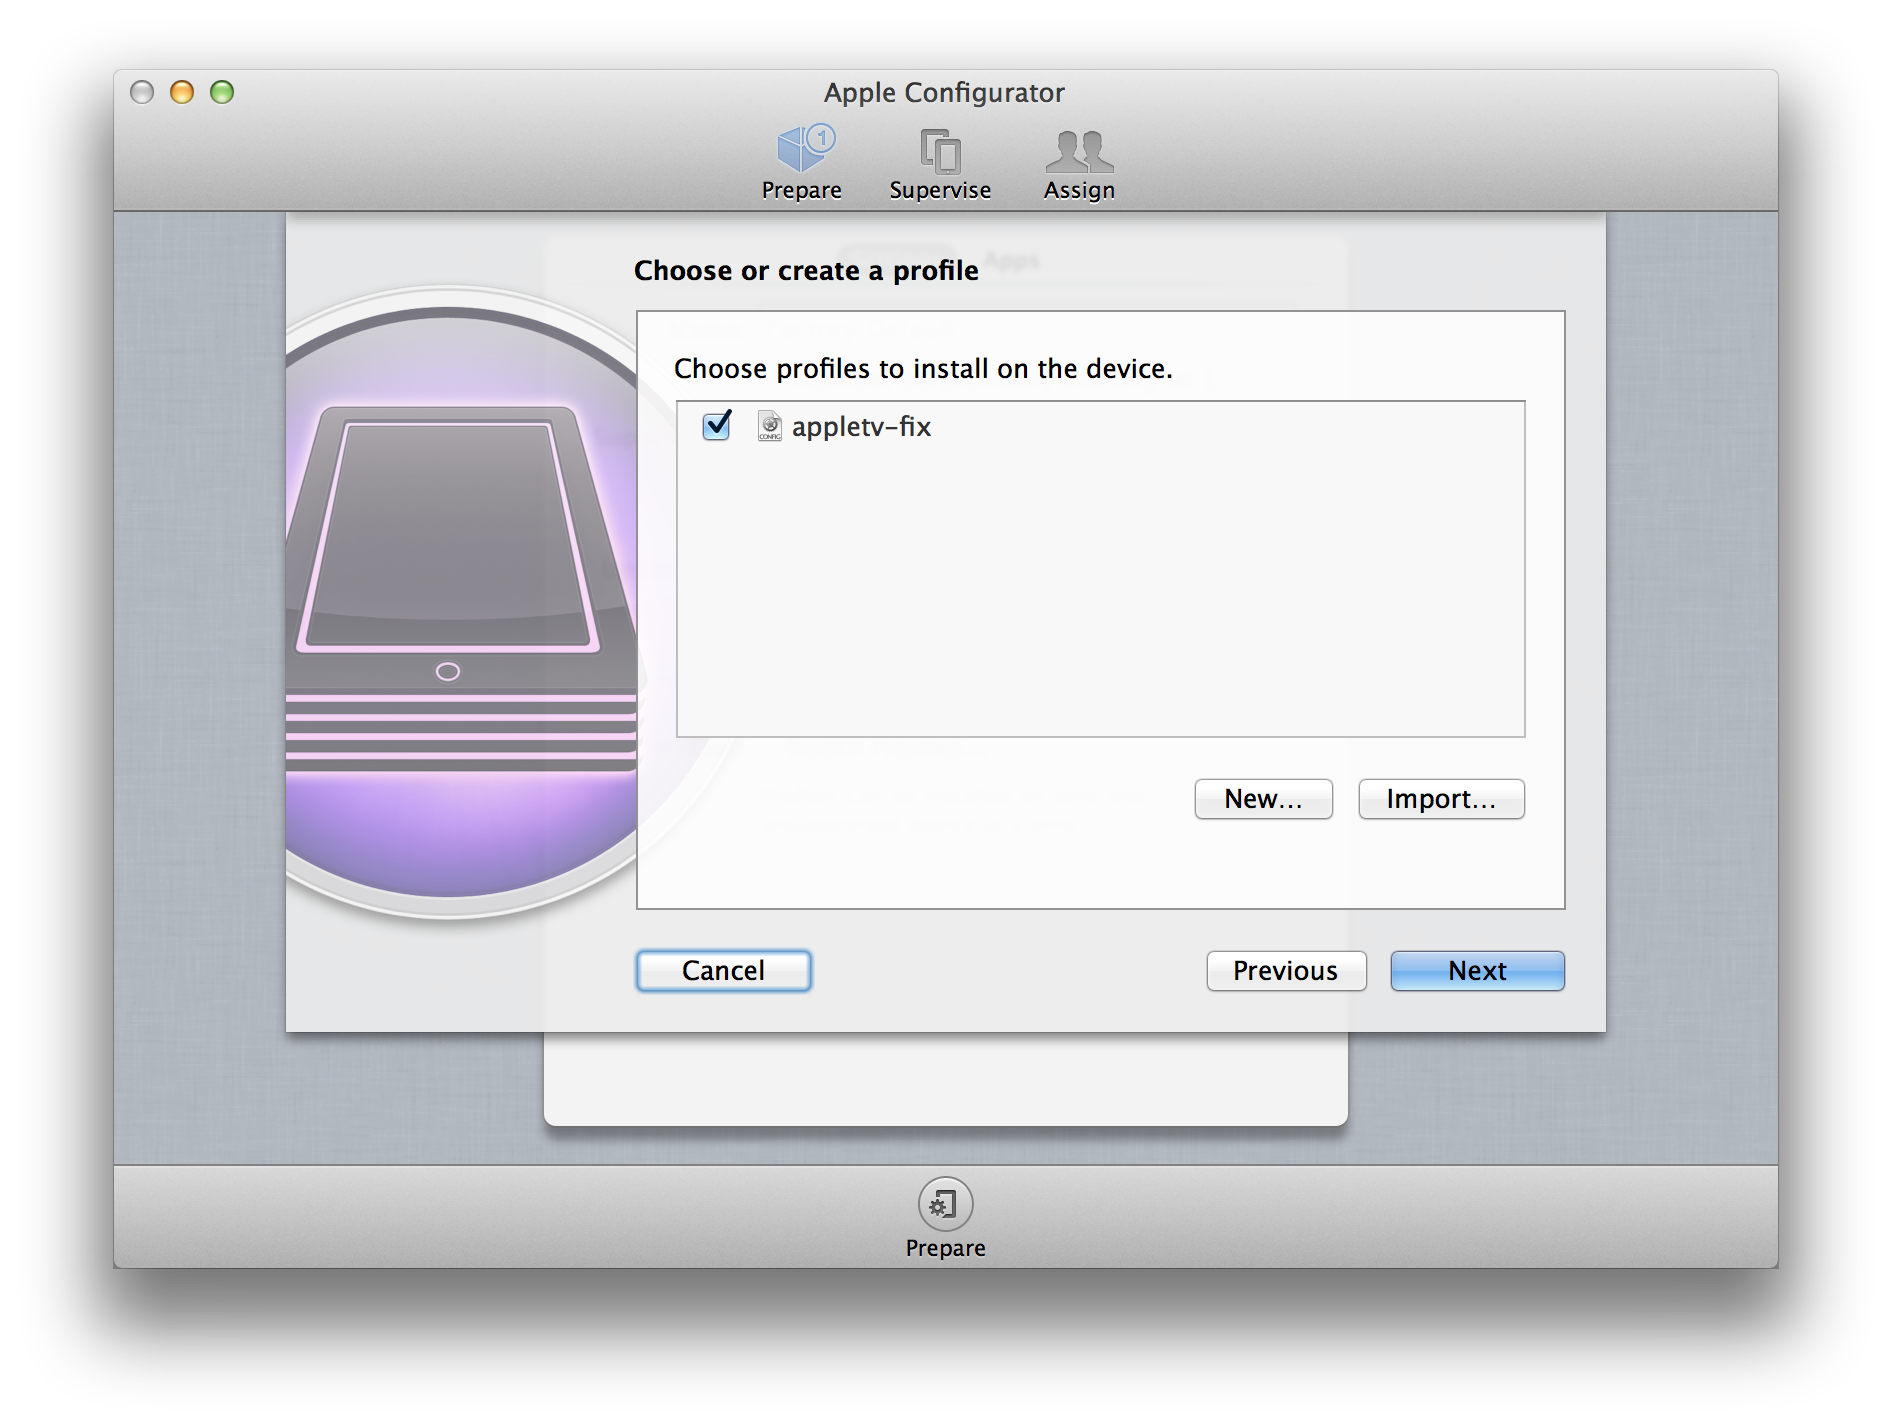 Click next and once you see the giant green check mark you’re good to go!
iPhone Configuration Utility Method (SKIP THIS IF YOU USED THE APPLE CONFIGURATOR METHOD screenshots are for Mac but the Windows version should work similarly)
Connect your AppleTV to your computer using the microUSB cable. You must have the AppleTV plugged into power when you do this or else it will enter recovery mode. Once it sees the device click on it on the left, then click the Configuration Profiles tab, and finally click install next to the configuration profile you want to install (you’ll only see one. The screenshot below has more just due to how many times I’ve run through this process).
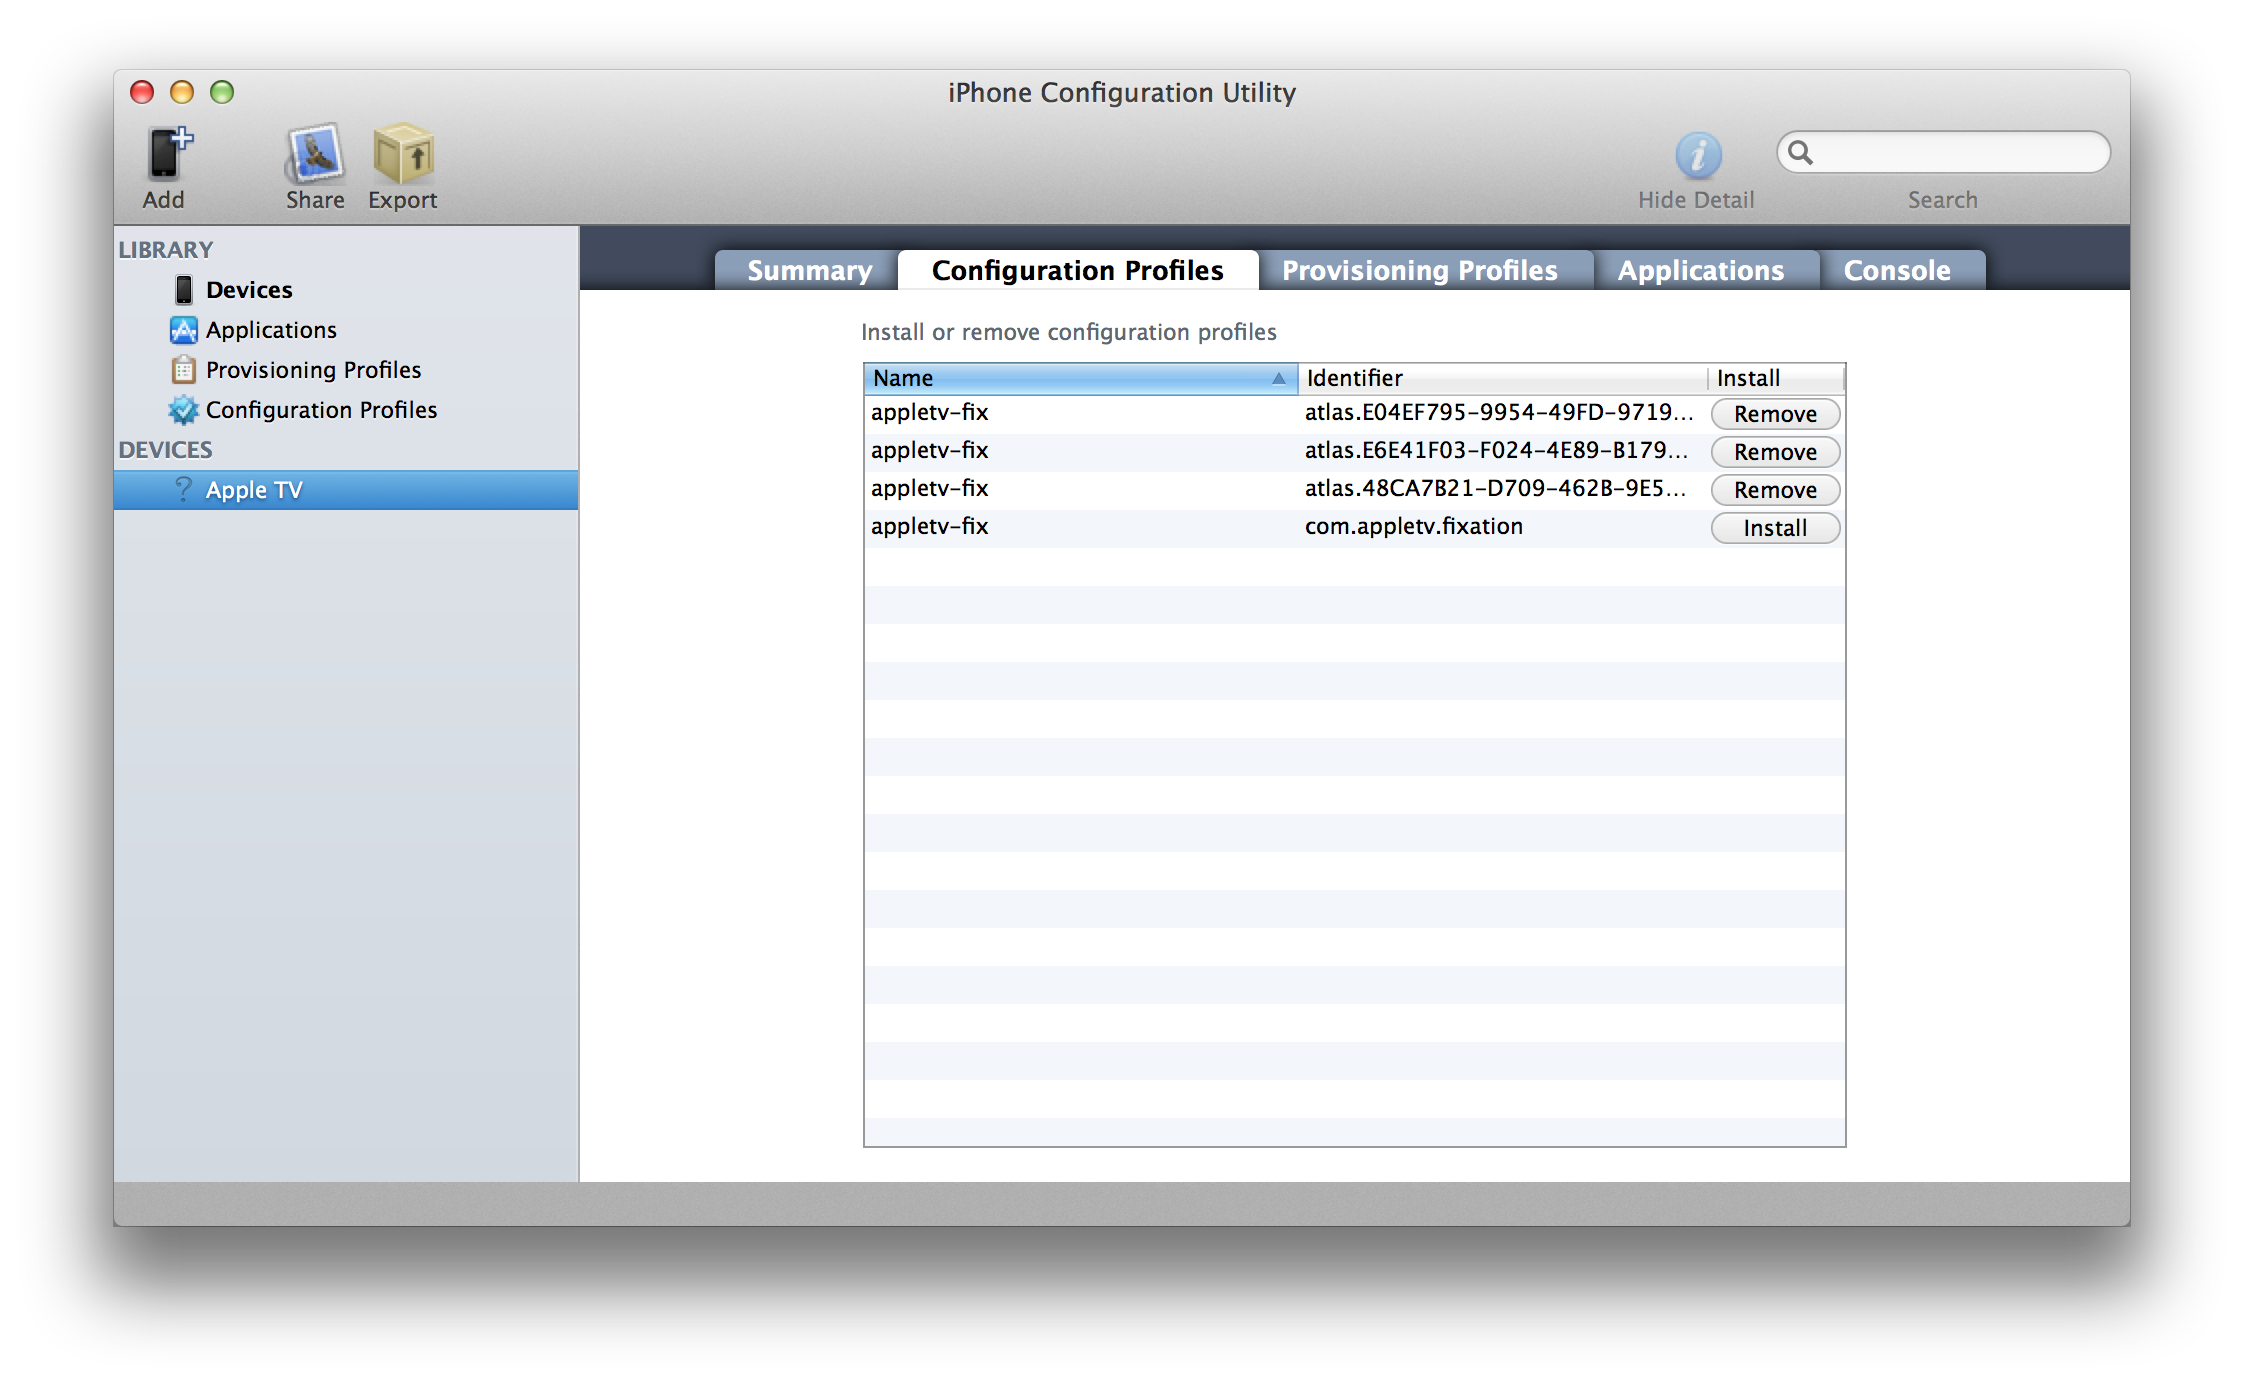 Once it says “remove” instead of install you’re all set!
Updating & Configuring PlexConnect PlexConnect needs some new stuff, so let’s get going. First, you’ll need to get the latest code. If you installed PlexConnect via git you can just do a git pull. If not, go to the PlexConnect site and follow the installation instructions again.
Once you’ve done that you’ll need to add two new lines to configuration. To do this just run PlexConnect and it will add the lines below automatically or create the entire Settings.cfg file if necessary. To run it execute sudo ./PlexConnect.py or depending on OS just PlexConnect.py or ./PlexConnect.py.
port_ssl = 443
certfile = ./assets/certificates/trailers.pem
Now we need to move the trailers.pem file so that PlexConnect can find it. Open the directory PlexConnect is in, open the assets directory, create a directory called “certificates” inside it, and then put trailers.pem inside certificates.
Putting It All Together
Moment of truth. Run PlexConnect (sudo ./PlexConnect.py or however you choose to run it) and everything should work!
Troubleshooting
I get an error about insufficient privileges
You need to run PlexConnect as root on OS X/Linux so it can bind to port 80 and 443. Use sudo (or check out the main PlexConnect install guide)
It says something about Address already in use
This means there’s another process on your system already using the ports PlexConnect needs. If you’re on Windows and have vmware installed look here for instructions on changing/disabling the port it uses.
If you are running PlexConnect on an embedded device like a Synology NAS then port 443 is likely to be taken already. Check in the settings to see if you can change the port it is using from 443 to something different to avoid the conflict. PlexConnect must take 443.
If neither of those apply to you then chances are you’re already running an instance of PlexConnect and need to kill it. Find/kill it via a process manager. If you don’t know how to kill a process you can try rebooting.
I get no error but it still isn’t working
This is typically due to an invalid path for your certfile. Make absolutely sure it’s the right path (you can edit the Settings.cfg to change it with any text editor). If you don’t run plexconnect from the command line (e.g. using an automated service script, etc) you may need to set the path to be absolute rather than relative. For example, on OS X if you keep PlexConnect in your Applications folder it’d be something like /Applications/PlexConnect/assets/certificates/trailers.pem
You may also want to upgrade Python. To check your python version type “python –version” (without the quotes) in a terminal window and hit enter. Ideally you should be on 2.7 or higher.