Set Up Linksys/Cisco PAP2T-NA With Gizmo5/Google Voice
Gizmo5 (recently acquired by Google) gives you a SIP phone number that you can link to Google Voice. This lets you use the Gizmo5 application to receive phone calls. But what if you want to use a real phone? Enter the ATA (Analog Telephone Adapter). Using a VoIP ATA you can hook in a normal telephone and receive calls from your Google Voice number like a landline!
For this tutorial I’m going to give the configuration requirements for a Linksys/Cisco PAP2T. Unfortunately, ATAs have a myriad of settings so it’s difficult to say exactly what you need to configure if you’re not using this model, but hypothetically speaking the settings should be similar.
With that caution out of the way let’s get started…
Prerequisites
To do this you will need an ATA (preferably a Linksys PAP2T-NA), a Gizmo5 account, and a Google Voice account. If you don’t have a Gizmo5 account you’re out of luck for now, because new signups are closed. If you meet these requirements then you’ll need to look up your Gizmo5 SIP number (starts with 1747). This can be found in your account overview at my.gizmo5.com. Write it down or copy it to a text file because we’ll use it in a few different places.
Configuring your Linksys PAP2T-NA ATA
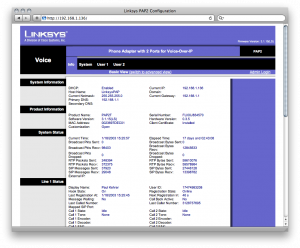
Connect your PAP2T-NA to your network. It will obtain a DHCP lease, but you need to know the IP so you can look at the web interface. To find this, you can typically go look at the “device list” on your local router (which is frequently found at http://192.168.1.1). The ATA should show up named “LinksysPAP”. Once you’ve found the IP, type it in your browser and you will see this screen.

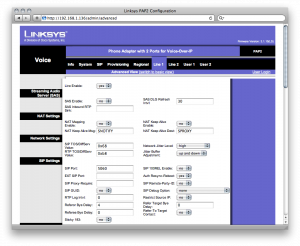
Now you’ll need to click admin login, then click advanced view, then click line 1. This will bring you to this screen:

Now scroll down and find the following options. Make sure they’re set as follows (don’t touch any other settings)1.
Sip Port: any port from 5060-5099 Proxy: proxy01.sipphone.com Use Outbound Proxy: no Outbound Proxy: leave blank Use OB Proxy in Dialog: no Register: yes Make Call Without Reg: no Register Expires: 60 Ans Call Without Reg: no Use DNS SRV: no DNS SRV Auto Prefix: no Proxy Fallback Intvl: 3600 Proxy Redundancy Method: normal Display Name: Your Name User ID: 1747####### (Gizmo5 ID) Password: yourgizmo5password Use Auth ID: yes Auth ID: 1747####### Preferred Codec: G711U Use Pref Codec Only: no DTMF TX: Auto Dial Plan: ([2-9]xx[2-9]xxxxxx|011xx.|1[2-9]xx[2-9]xxxxxx)2
Now click regional and change the ring waveform to “sinusoid” and the ring voltage to 90.
Finally, you’ll need to set up STUN support under the SIP tab. At the bottom of the page set the following settings:
STUN Enable: yes STUN Server: stun01.sipphone.com EXT RTP Port Min: 3478
Click save settings and let’s move on to configuring Google Voice.
Configuring Google Voice and Gizmo5
Head to the Google Voice website, click settings, then click “add another phone”. Select Gizmo, put in your 1747 number from earlier, and follow the directions. When it calls you to verify the number the landline you’ve connected to your PAP2T-NA should now ring. Once you’ve verified the phone you are done. To test you can call your Google Voice line yourself, or use the Google Voice website to call someone else! Enjoy your free phone.
-
Hat tip to this thread for the requisite settings. ↩
-
The dial plan is only required if you wish to enable direct dialing of outbound calls (which costs money). ↩